pfSense is pretty easy to use and set up, as well as very functional. Let’s look at how to set up a basic install. This post assumes you know how to create a new virtual machine and start the install process from an ISO file. One thing to keep in mind, however, is that you’ll need to give your VM two network interfaces (NICs). One connected to the external network (or competition network), the other connected to your internal network. The firewall sits in between the “outside” and the “inside”, so it needs to be able to connect to both.
The installation of the OS is fairly standard – pfSense is based off of FreeBSD. You can download the ISO here if it isn’t already provided as part of the CDC.
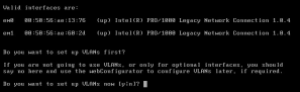
Once you get booted in, most default options are fine – the first interaction you’ll really have will pass by pretty quickly so here’s a picture of it.
 You’ll need these to log into the web-configurator (it’s a word, look it up.) For now, just know it’s here.
The first question you need to answer will be if you want to set up VLANs now. You don’t. You won’t be using them. Another thing to take note of – The prompt shows you your network interface cards and their names. These are important – here’s a picture of mine:
The important bits are the “em0″ and “em1″ – one is your external interface (WAN), the other is your internal interface (LAN). If you aren’t sure which is which, you can look at the hardware address directly to the right of the interface card name and match that up with the cards listed in vSphere. Right click on your pfSense VM and click edit settings. Expand your two network card settings like so:

Back to the pfSense install, however, the next prompt will ask you to enter your WAN interface – enter either “em0″ or “em1″ depending on which is connected to your external network (or whatever your interface was called.) Next, do the same for LAN – mine is on em1, so I’ll type “em1″ and hit enter. These are the only two options you’ll need to set, so if you are prompted with other questions, be sure to rage.
Just kidding, don’t do that. Just hit <enter> through them. Lastly, you’ll have to acknowledge that you meant everything you said.
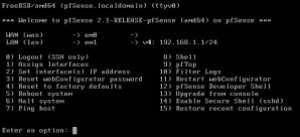
My LAN IP address is already assigned:
You can use a separate VM on your internal network that has a web browser to navigate to the IP address listed. I usually just install Ubuntu Desktop onto a fresh VM and use that as my testing/configuration box. Whatever you decide to do, you’ll need a web browser from a machine on your internal network.

The credentials are the default ones that we took note of earlier – Username: “admin”, Password: “pfsense”.
Since this is your first time logging in, it SHOULD automatically pull up the setup wizard. If for some reason it doesn’t, you can go to the “system” menu and select “setup wizard”.
In the “General Information” screen, the only setting you’ll need to change is your DNS server. This IP address will have been provided by the competition. Mine is 199.100.16.100.
You can just hit “next” through the time zone prompt. Unless you care to change it. Up to you. Doesn’t really matter.
On this next screen, we are configuring our WAN interface. You’ll need to change the SelectedType to “Static”. Under “Static IP Configuration”, set both the static IP for your WAN interface and your gateway. This IP address will be one on your external network – This range has likely been provided to you. Your gateway should have been provided to you as well, but it typically the .254 of your external network. For instance, my IP range is 64.4.53.0/24, so I’ll set my WAN interface IP to 64.5.53.22 (because I’m feelin’ 22 … *ahem*, sorry), and my gateway to 64.5.53.254. Everything else can stay as is.
On the next screen you have the option to change your LAN IP address – it’s up to you. Leaving it may just be simpler.
Lastly, you can change your admin password … You should do that. Leaving the default password on your firewall would be a very poor security choice.
After clicking “here” to go on to the web configurator (see, told you it was a word) you should be up and running! Congrats!

Now, a few things to note as we embark on the journey that is our brand new firewall. By default, pfSense is configured in such a way that:
- All incoming connections to WAN are blocked
- All outgoing connections from LAN are allowed
- NAT is performed on IPv4 traffic leaving WAN from the LAN subnet
If you want to learn how to do something very specific with your firewall, your best bet is to Google it. Or Bing it. Bing it? Is that a thing?
However, here are some common things you’ll want to know how to do.
Allowing Traffic Through to a Specific Server
So this occurs when, for example, you need to allow access from “the outside” to your web server, for example. The firewall with its default configuration blocks anything coming from the outside trying to connect to the inside of your network.
The idea behind that is that we want to block everything *except* what we know is ok. So for example, we know that HTTP traffic coming to http://www.teamN.isucdc.com over port 80 should be allowed. So let’s allow it!
Go up to the “Firewall” menu option and select “rules”. 
From here, we want to add a new rule, so click the “+” looking button: 
Going in order for the options on this page, we want to create a “Pass” rule. Do not disable the rule. The interface is the WAN. Apply the rule to IPv4 traffic. Apply the rule to TCP traffic.
Next, the source can be any (the default). What this means is that we don’t care where the traffic is coming from. You likely shouldn’t change this (especially if you’re participating in a CDC – the red team will have the same IP addresses as your users, so you can’t simply block out their IP addresses. Good thinking though. ) We DO care about the source port range, though. Click the advanced button in that section, and the source port option should show up. 
Here’s where you have to stop just doing what I’m telling you to and think! What server are you trying to allow access to right now? Web? FTP? SSH? ASDF? Depending on which server it is, the port will be different. If you’re not sure, Google it, but here are some common ones:
- FTP – Port 21
- SSH – Port 22
- SFTP – Port 22
- HTTP – Port 80
- HTTPS – Port 443
- RDP – Port 3389
If you know the port, just type it into both scary red boxes (we don’t want a range, so our start and stop are the same.) Also, pfSense has some ports that it already knows about, so it will auto-fill the boxes for you if you want to use the drop-down menu to the left of the red boxes.
Next, under the “Destination”, we want to select “LAN address” from the drop-down menu, then fill in the internal IP address of our server. Next, fill out the destination port ranges in the same way you did with the source ports. This means that someone coming in over Port-whatever to your server will be redirected to the internal IP on your network at Port-whatever. Good work! I trust you can repeat these steps for your remaining servers.